
MyQ Roger supports multiple Microsoft 365 integration features, each implemented through a dedicated Azure App Registration. This approach enables secure and purpose-specific authentication flows using Microsoft Identity and related APIs such as OneDrive, SharePoint, Universal Print, and User Synchronization.
Users also have the option to register and use their own Azure applications, managing the required scopes and permissions independently according to their organizational policies.
Prior to MyQ Roger Server 2.20, Integration options were managed through Entra ID User Synchronization, Microsoft Universal Print, and Cloud Services Settings. For accounts that managed integrations in this way, the system will continue to support previous settings including all necessary scopes (OneDrive, SharePoint, Universal Print, User Synchronization, and email) under two app registrations, one covering User Synchronization, the other covering the remaining features. This ensures a smooth transition for existing integrations while supporting more granular configurations in the future.
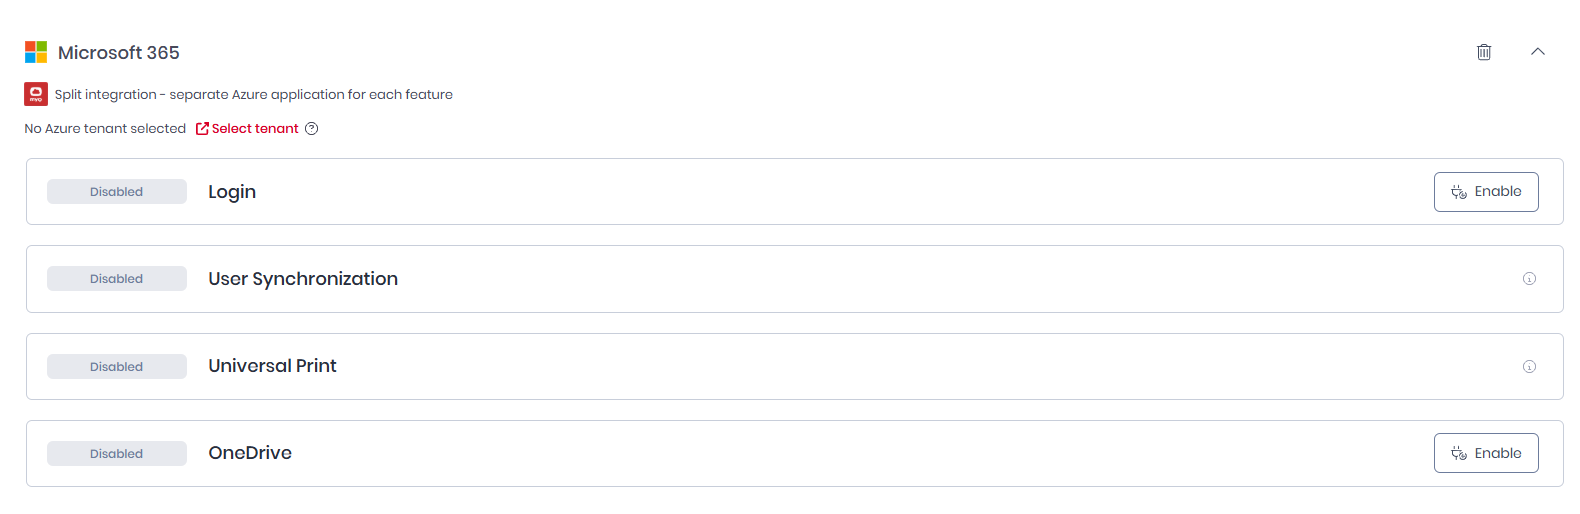
Features Supported
Using Integrations with Microsoft 365 you can manage the following aspects of your Roger tenant:
-
Login
-
User Synchronization
-
SharePoint
-
Universal Print
-
OneDrive
The scopes and permissions required for each are specified on their respective pages.
Application Types
Integrations can be managed using two different Entra ID Application types:
-
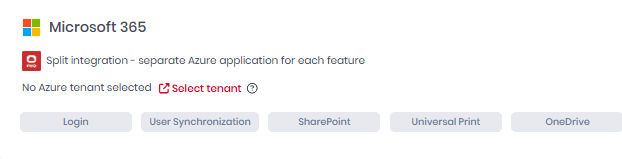
Split Applications: Created automatically using a MyQ Roger Application, each Integration feature has a dedicated app registration in the MyQ Azure tenant.
-
MyQ Roger Applications: Created manually, one Entra ID application is used for the main Roger integration, together with the customer’s own Entra ID app for user synchronization.
Adding a Microsoft Integration
To add a Microsoft 365 application to your MyQ Roger Tenant:
-
In Administration>Integrations select + Add Integration and choose Microsoft (other options will become available with later releases).
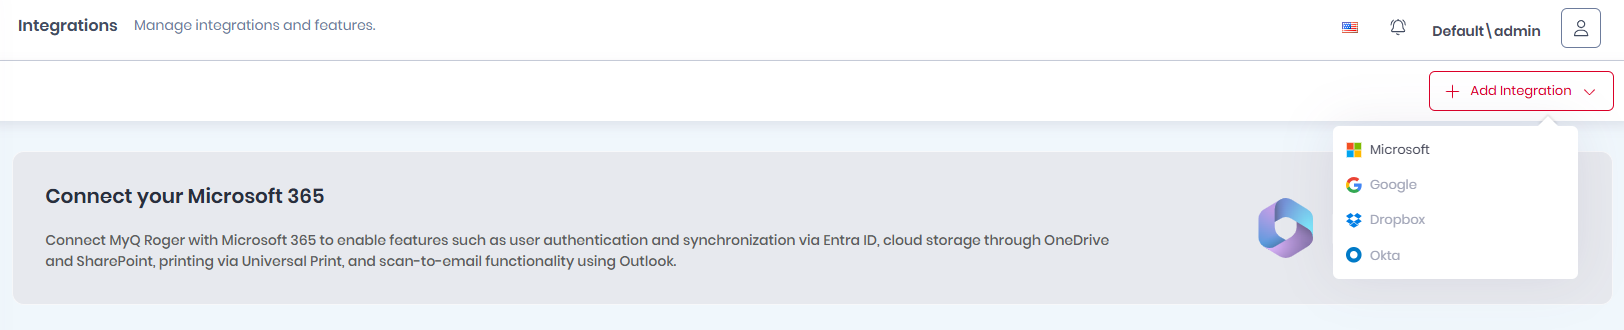
-
Select how to add the integration:
-
Create automatically: Choosing this option will automatically use a predefined set of MyQ Roger applications, one per feature, such as MyQ Roger for OneDrive or MyQ Roger Entra ID Connector. Simply select Create automatically, click Save, click Select tenant, and log into the relevant Entra ID instance. Automatically created Integrations only function in Roger Client if using version 2.5+.
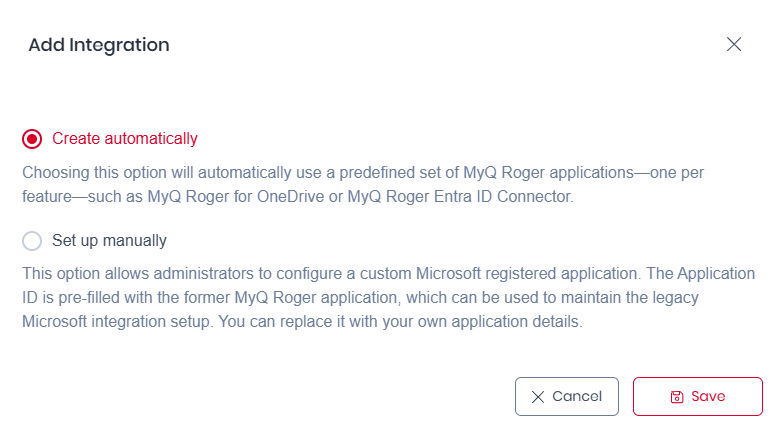
-
Set up manually: This option will allow you to use the legacy MyQ Roger App (recommended process) or create integrations with your own custom Azure Apps.
-
-
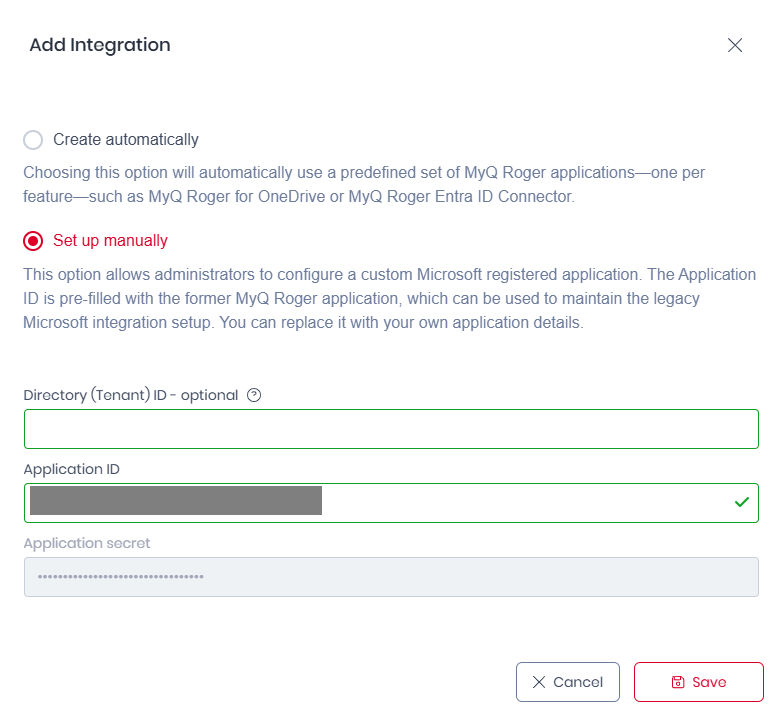
If you selected Set up manually:
-
You must have existing Azure Active directory where you will:
-
Create new App registration (https://docs.microsoft.com/en-us/azure/active-directory/develop/quickstart-register-app).
-
Go to Certificates & secrets and Create new secret. Set an expiration date and copy the secret value (back up the value, it will not be displayed again).
-
The App registration must have the permission
User.Read.All, andGroup.Read.All(if you only want to synchronize certain groups). To set them, select API permissions > Add a permission.
-
-
Then in the Add Integration dialogue in the Roger Web UI:
-
(Optional) Enter the Directory (Tenant) ID: Enter your Azure Entra Tenant ID to restrict Microsoft-related features to that tenant. If left blank, these features can also be used with personal accounts. You can also add the Tenant ID later.
-
Enter the Application ID: In cases where a pre-Integrations connection with a Microsoft 365 Application existed, this is pre-filled with the former MyQ Roger application, which can be used to maintain the legacy Microsoft integration setup. You can replace it with your current application details.
-
Enter Application Secret: If the Application ID is changed, the Application Secret must be updated to correspond.
-
Click Save. The Microsoft 365 Application is created, by default all features are disabled.
-
-
Limitations
Each Microsoft tenant can have only one enabled instance of the same integration feature type.
When enabling a feature, the system checks whether another enabled feature of the same type already exists for the same Microsoft tenant. If it does, an error message is shown.
If switching from the legacy MyQ Roger app, the consents related to cloud storages or Microsoft services will be revoked and users will be prompted to reconnect via the new app.
Troubleshooting
If you experience difficulties using the features in Integrations, for example connecting cloud storages or synchronizing users, please Reapply Consents.
Deleting Integrations and Changing Integration Type
Once you have an existing Microsoft Integration or switched from a legacy application to a split application, the following steps should be taken:
-
After adding a new integration with an Entra tenant, you must enable and rerun user synchronization with Manage existing users enabled in the user synchronization template.
-
Login, OneDrive, SharePoint, and Universal Print to need to be reenabled in the new integration.
-
Users with connected cloud storages will need to reconnect each instance.
-
Cloud connected users will need to reauthenticate in Roger Client.