
Workflow Templates require the paid MyQ Roger Cloud Print Management subscription edition.
Workflow templates with preconfigured parameters are now available in MyQ Roger. They can simplify and speed up users' Scan Profiles and Copy actions.
This feature allows administrators to create and manage customized sets of workflows and assign them to users and user groups.
Once created and assigned to a user or a user group, a workflow template is available for use in the MyQ Roger Mobile app and MyQ Roger printers.

Default Workflow Template
When creating a new tenant or activating the workflow templates feature in your existing tenant, a predefined Default Workflow Template is generated and assigned to all users and user groups.
-
The Default Workflow Template cannot be deleted, but it can be renamed via the edit button in the upper-left corner.
-
You can also click the Restore defaults button to restore the Default Workflow Template to its default state.
All existing and any subsequently added users or user groups, either manually or via user synchronization, are automatically assigned to the Default Workflow Template.
-
You can delete users or user groups from the Default Workflow Template by hovering over the user or user group on the template and clicking the trashcan (delete) button.
Workflows that are part of the Default Workflow Template can be added, removed, and modified according to your needs.
The following workflows are part of the Default Workflow Template:
-
Scan to Box - Scan to Box. This workflow is only available in the MyQ Roger Mobile app. (Box has to be connected to your tenant and the user must be already connected to their Box)
-
Scan to iCloud - Scan to iCloud. This workflow is only available in the MyQ Roger Mobile app. (only available to Apple users)
-
Scan to Dropbox - Scan to Dropbox. This workflow is only available in the MyQ Roger Mobile app. (Dropbox has to be connected to your tenant and the user must be already connected to their Dropbox)
-
Scan to Google Drive - Scan to Google Drive. (Google Drive has to be connected to your tenant and the user must be already connected to their Google Drive)
-
Scan to OneDrive - Scan to OneDrive. (OneDrive has to be connected to your tenant and the user must be already connected to their OneDrive)
-
Scan to my phone - Save the scanned document to the user’s phone.
-
Easy copy - After the user taps this action, the page is immediately copied.
-
Scan to @email - Scan to an email address/es.
-
Scan to @me - Scan to the user’s email address/es.
Creating a Workflow Template
-
On the left-side menu options, go to Workflows>Templates.
-
On the upper-right side, click Create template.
-
In the pop-up window, add a Display name for your new workflow template and click Save.
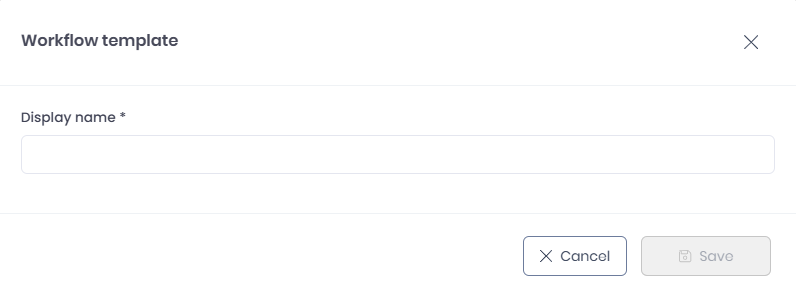
-
Your new workflow template is created, and you can now add workflows to it and assign it to users and user groups.
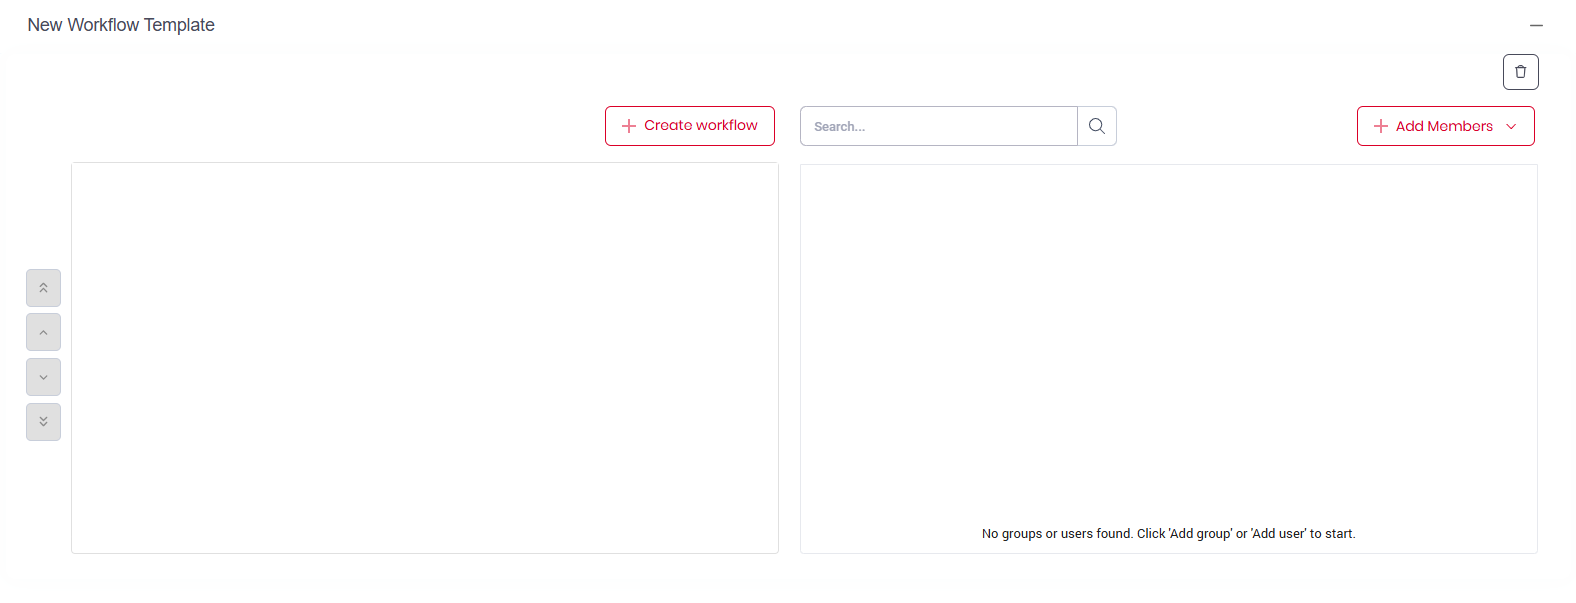
Adding a Workflow to a Template
You can create new workflows for the Default Workflow Template or any other templates you have.
-
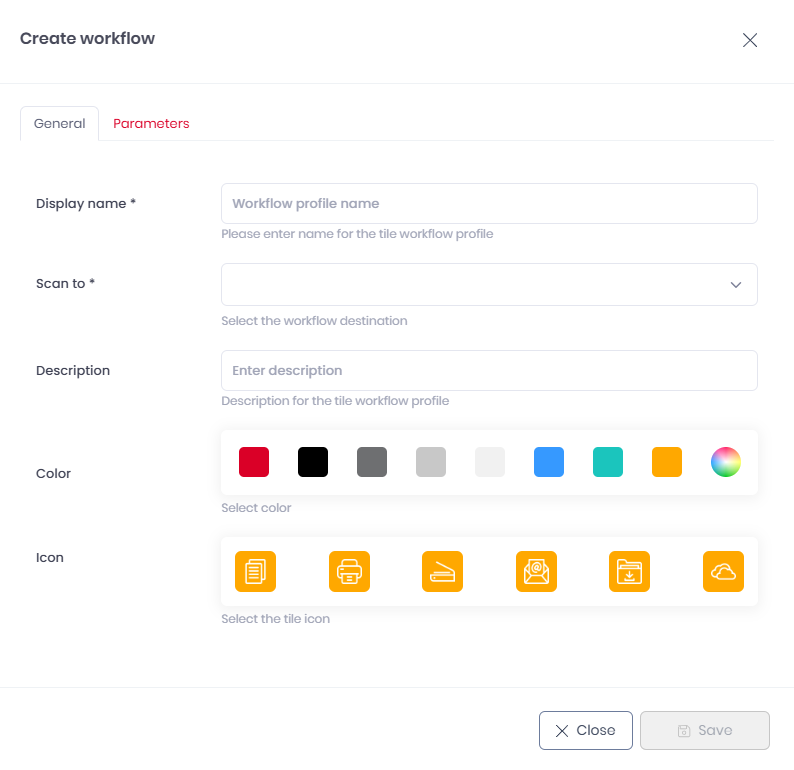
In the workflow template you want to expand, click Create workflow.
-
In the pop-up window, in the General tab, design the new workflow according to your needs:
-
Display name - Add a name for your workflow that will be displayed on the MyQ Roger mobile app and MyQ Roger printers.
-
Description - Add a description for the workflow.
-
Color - Select a color for the workflow’s tile.
-
Icon - Select an icon for the workflow’s tile.
-
Scan to - Select the scan’s destination. Depending on your choice, more options become available. The available destinations are:
-
Email
-
Predefined email - specify the email address or comma separated addresses
-
Ask me every time before scan
-
User’s email address
-
-
OneDrive (OneDrive needs to first be connected to MyQ Roger).
-
How to save - Select the saving destination. The available options are:
-
Save to MyQ Scans (this is the MyQ Scans folder in your cloud storage)
-
Ask me after scanning
-
-
-
Google Drive (Google Drive needs to first be connected to MyQ Roger).
-
How to save - Select the saving destination. The available options are:
-
Save to MyQ Scans (this is the MyQ Scans folder in your cloud storage)
-
Ask me after scanning
-
-
-
SharePoint (the SharePoint option only becomes available with a specific license and SharePoint needs to first be connected to MyQ Roger).
-
SharePoint site URL - Enter the SharePoint site’s URL. Go to the site’s home page and copy the URL here. For example: https://company.sharepoint.com/sites/MySite. MyQ will scan to the Documents library.
-
How to save - Select the saving destination. The available options are:
-
Save to MyQ Scans (this is the MyQ Scans folder in your cloud storage)
-
Ask me after scanning
-
Save to a predefined folder
-
Save to folder - Specify the exact folder path.
-
-
-
-
USB (not supported on Kyocera devices)
-
Print
-
iCloud (Only available in the MyQ Roger Mobile app)
-
Dropbox (Only available in the MyQ Roger Mobile app)
-
How to save - Select the saving destination. The available options are:
-
Save to MyQ Scans (this is the MyQ Scans folder in your cloud storage)
-
Ask me after scanning
-
-
-
Box (Only available in the MyQ Roger Mobile app)
-
How to save - Select the saving destination. The available options are:
-
Save to MyQ Scans (this is the MyQ Scans folder in your cloud storage)
-
Ask me after scanning
-
-
-
Phone (Only available in the MyQ Roger Mobile app)
-
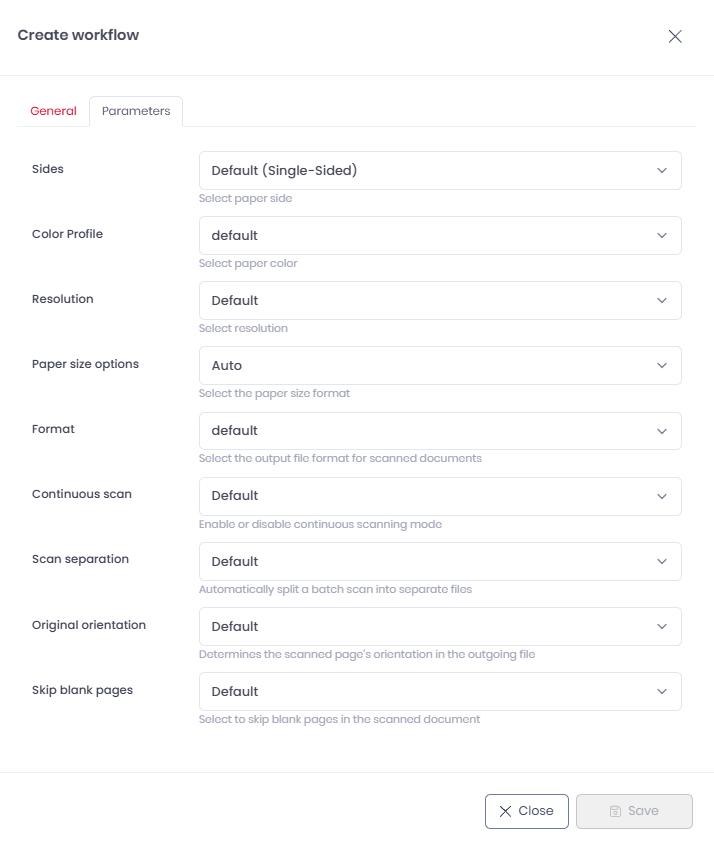
In the Parameters tab, specify the parameters required for your workflow:
-
Sides - choose a duplex/simplex option from the list: Default (Single-Sided), Double-Sided (Long Edge), Double-Sided (Short Edge).
-
Color Profile - choose the job’s color: Default, Mono, Auto, Gray, Full.
-
Resolution - choose the job’s resolution: Default, 100, 200, 300, 400, 600, 1200.
-
Paper size options - choose the job’s paper size: A3, A4, A5, A6, Auto, B4, B5, B6, Executive, Folio, Ledger, Legal, Letter, Mixed, Oficio II, Statement.
-
Format - select a file format.
-
Continuous scan - change continuous scan settings.
-
Scan separation - change scan separation settings.
-
Original orientation - change the orientation settings.
-
Skip blank pages - turn skip blank pages on or off.
Once done with both the General and the Parameters tabs, click Save to apply your changes and save the new workflow.
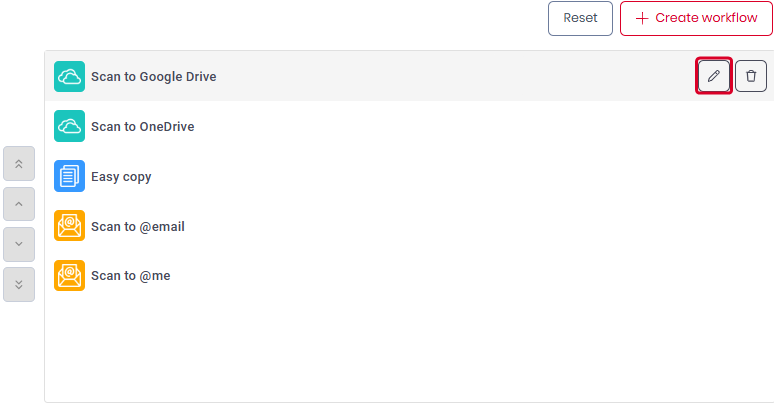
Editing a Workflow
To edit a workflow,
-
Hover over it in your workflow template and click on the Edit button next to it.
-
In the pop-up window, modify the workflow’s general and parameter settings, and click Save.
To delete a workflow,
-
Hover over it in your workflow template and click on the trashcan button next to it.
To move a workflow up or down on the list,
-
Select it and click on the up or down buttons to the left.
This order is reflected in the MyQ Roger Mobile app and MyQ Roger printers.
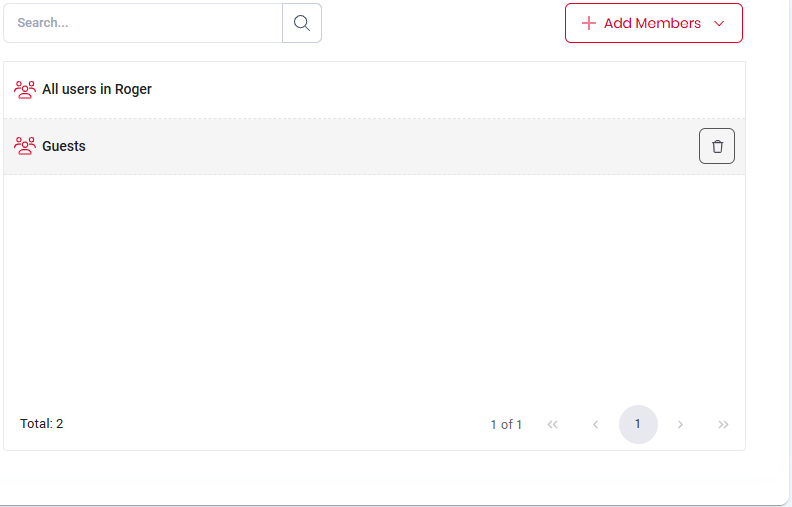
Adding Users and Groups
Adding users/user groups to a workflow template gives them the ability to use the workflow.
In your workflow template,
-
Click Add members on the right side of the screen and select Add Group.
-
Select the user groups from the list and click Save.
If you want to add specific users to your workflow template,
-
Click Add members on the right side of the screen and select Add user, select a user and click Save.
To delete any users or user groups,
-
Hover over the user or user group and click on the trashcan button next to it.
To check if a user has been added to the workflow,
-
Click in search bar and type in the user’s First Name or Surname, then click the search icon.
You cannot search by username.
To go back to the full list of added users, either refresh the page or remove the first name/surname from the search bar and click on the search icon again.
Workflow Templates Transition
As mentioned, workflow templates is a paid feature. When you upgrade to a license tier with the workflow templates feature included:
Tenant with no users - If a new tenant has been upgraded, then just delete all the workflows for all (default) users and replace them with the default template.
Tenant with existing users - No change shall take place until the tenant administrator logs in to the MyQ Roger web UI to initiate the transition. There, the administrator is presented with two options:
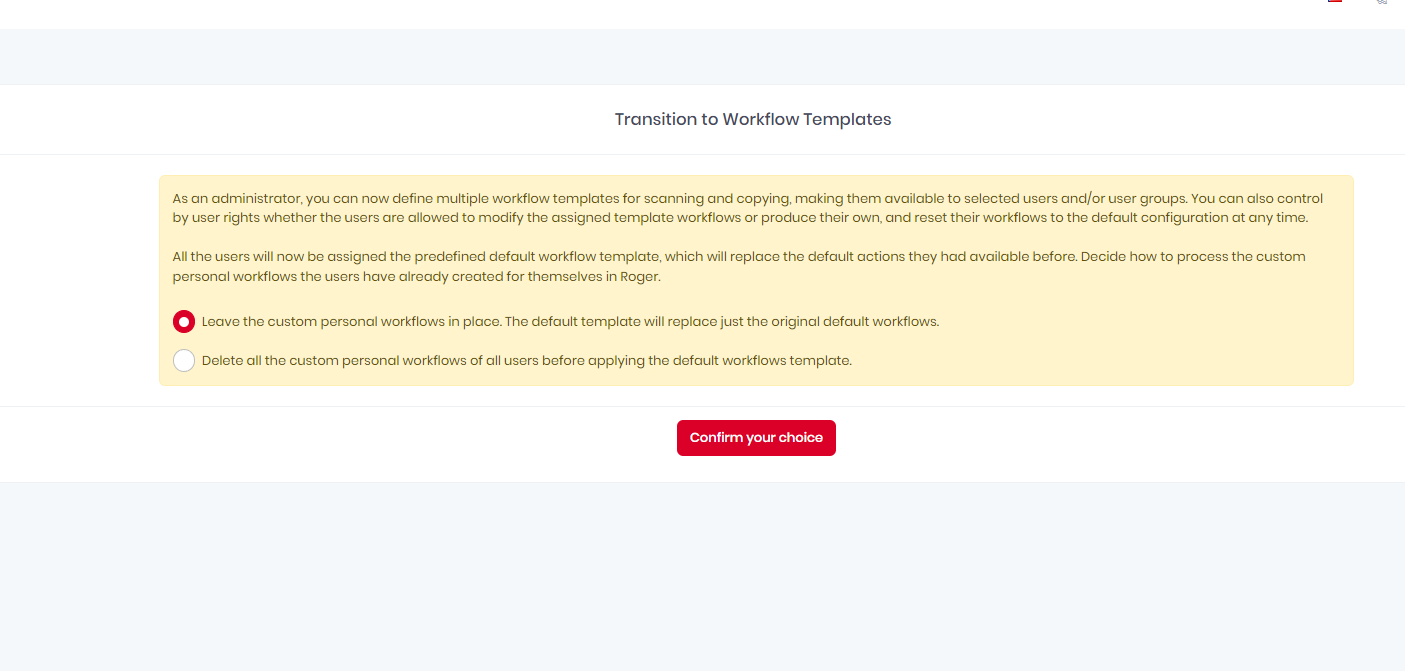
As an administrator, you can now define multiple workflow templates for scanning and copying, making them available to selected users and/or user groups. You can also control by user rights whether the users are allowed to modify the assigned template workflows or produce their own and reset their workflows to the default configuration at any time.
All the users will now be assigned the predefined default workflow template, which will replace the default actions they had available before. Decide how to process the custom personal workflows the users have already created for themselves in Roger.
-
Leave the custom personal workflows in place. The default template will replace just the original default workflows.
-
Delete all the custom personal workflows of all users before applying the default workflow template.
The first option deletes just the original default workflows for all users, replacing them with the default template. The second option wipes all the workflows clean (both favorite and recent) before applying the default template.