
Device Spooling is a feature that saves your print jobs directly onto the device's hard drive.
This gives you the freedom to release your documents at any time, even if the computer you printed from is turned off, asleep, or disconnected from the network. It's the most reliable way to print from a PC, and because the job is stored locally, the release is instant.
Device Spooling can be used via two ports:
-
10011: Port for secured hold print. The job is spooled by the printer and waits there until the user logs in and prints it. It is not possible to print this job on any other than this particular printing device.
-
10012: Port for Device Spooling pull print. The job is spooled by the printing device. Once the user logs on any of the devices connected to the same subnet, information about this job is provided and the job is displayed in the list of the available jobs and can be printed.
All jobs are stored on the device’s HDD. If port 10012 is used jobs sent to one printing device can be printed on any other printing device connected to the same local area network. If there are more mutually connected devices at the branch, the jobs spooled on the devices can be shared between them. In such cases, jobs sent to one device are displayed on the list of print jobs and can be printed on other devices.
Once the user logs on any of the devices connected to the same subnet, information about this job is provided and the job is displayed in the list of the available jobs and can be printed.
Windows Setup
You have to create a new print driver port and set the port protocol and port number.
-
Go to Windows Control Panel and open Devices and Printers. On the top ribbon, click Add a printer.
Windows automatically searches for devices. -
However, click The Printer that I want isn’t listed instead.
-
In the Add Printer window, select Add a local printer or network printer with manual settings, and click Next.
-
Under Choose a printer port, select Create a new port, and in the Type of port, select Standard TCP/IP Port, and click Next.

-
In the next window, type the
Hostname or IP addressof the printing device, and on the Port Name, add anamefor the port. -
Make sure that the Query the printer and automatically select the driver to use option is not checked and click Next.
-
Wait for the detection to fail, and in the next window, select Custom and click Settings.

-
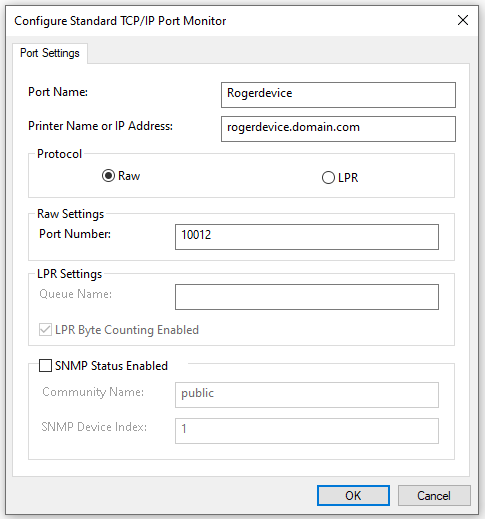
In the Printer Name or IP Address field, set the
hostname or IP addressof the printing device in your network. -
When configuring the port, use the Raw protocol and the 10012 port for pull printing.
-
Once you configure the Port Settings, click OK, and then click Next.
-
Select your printer driver based on your printer model or use the printer’s CD/DVD setup kit. After that, click Next.
If you already have this printer driver, you are asked whether you want to replace it. -
Select Replace the current driver and click Next.
-
Add a
Printer nameand click Next. -
In the Printer Sharing window, choose whether you want to share this printer or not, and click Next.
-
Mark the Set as the default printer checkbox if you want to make this the default printer and click Finish.
Roger User Aliases
Once above configuration is set, the Device user name must be added to user aliases of the user which will be matched with RAW jobs.
In Roger server,
-
Login as an admin user who has permissions to modify tenant users.
-
Navigate to Users category in the side panel.
-
Click Actions>Edit on a user that needs to be matched.
-
Add Device user name to user aliases.