
Installing the MyQ Roger Terminal to MFDs
Installing the MyQ Roger terminal to your Multi-Function Devices (MFDs) differs from brand to brand.
For detailed instructions, check the brand-specific MyQ Roger guides.
Connecting the MyQ Roger Terminal to the MyQ Roger Server
Once you have configured your MyQ Roger tenant and installed MyQ Roger on your MFDs, it is necessary to establish a connection between your tenant, your MFD, and your smartphone.
This can be done either via the MyQ Roger mobile app (recommended), or via using your device’s code in the MyQ Roger web server.
Via the MyQ Roger Mobile App (Recommended)
-
Log in to the MyQ Roger mobile app with your MyQ Roger credentials.
-
Once logged in to the app, simply use the Login button at the bottom-center of the screen to scan the QR code displayed on the MFD.
This way, the connection between your MyQ Roger tenant, your MFD, and your smartphone is established.
You see the Printer successfully paired notification on your phone, and the MyQ Roger log in-screen on your MFD. This action only needs to be done once, and as soon as it is successfully completed, the device is paired with your tenant and displays a dynamic QR code for users to log in.
There are more possible scenarios when scanning the QR code on the printer, that are also dependent on the user’s permissions:
-
The printer has not been registered yet with any tenant:
-
If the user has standard permissions (print, scan, etc.), they cannot pair the device. It fails and an error message is displayed on the mobile phone.
-
If the user has admin permissions (device pairing), they can pair the device with a tenant. The new record of the printer is created under the tenant, and the printer is immediately active. A new QR code is displayed and any user on that tenant can log in.
-
-
The printer is registered (paired with the same tenant as the user):
-
The user (with standard and/or admin permissions) is logged in to the printer and can control it via their mobile phone.
-
-
The printer is registered with a different tenant:
-
Since the printer is paired with a different tenant, it cannot be used, and an error message is displayed on the mobile phone.
-
-
The user is unable to log in:
-
Check if the correct MyQ Roger tenant is used.
-
Check if the user’s account is locked.
-
Check if the user’s account is deactivated.
-
It’s not possible to bring up the registration screen (with the QR code) on a device once it has been paired with a tenant. The administrator should either release the pairing on the server or do a fresh re-installation of the embedded application (delete it from the device and then re-install it).
You can also log in via NFC, if the device has already been paired by the administrator and if NFC is supported by your phone.
To pair the device,
-
Tap the Login button and then tap the information button
next to the Login via NFC option.
-
Tap Pair new tag. Bring the phone close to the printer and tap Write to NFC tag.
Once done, scan the QR code on the printer to finish the device pairing.
To log in via NFC,
-
Tap the Login button and select Login via NFC.
-
Move your phone close to the NFC tag on the MFD.
Once your phone reads the tag, you are logged in to the MFD.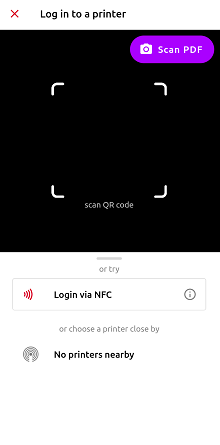
Another option is to log in to an MFD paired via Bluetooth if the device is connected with a BLE reader.
Any Elatec reader with BLE support can be used, and the reader has to be configured specifically (contact MyQ for the configuration).
-
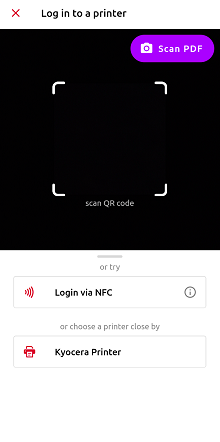
Once the BLE reader is configured, tap the Login button on the MyQ Roger mobile app and select one of the paired printers from the list.
-
If there are no printers on the list, select Discover printers via Bluetooth. Once an unknown device appears on the list, tap on it and scan the QR code to pair it.
Your MyQ Roger setup is now complete, and you can start working with it.
For a detailed MyQ Roger mobile app overview, check the MyQ Roger Mobile App Installation and Usage guide, and the brand-specific MyQ Roger guides.
Via the Device Code in the MyQ Roger Web Server
In the MyQ Roger web server, go to Supervision > Printers.
To remotely register, pair, and log in to a device,
-
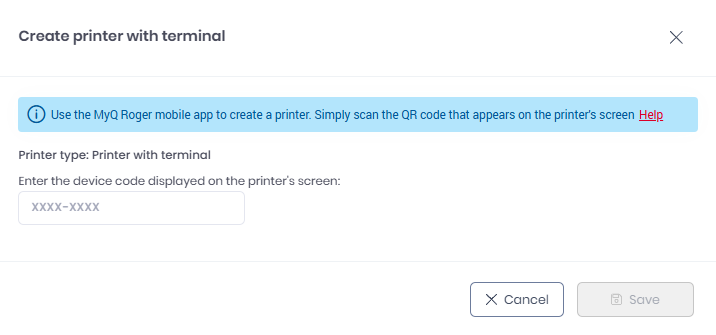
Click the Create printer with terminal button.
-
Enter the device code displayed on the printer’s screen and click +Create.
Your MyQ Roger setup is now complete, and you can start working with it.